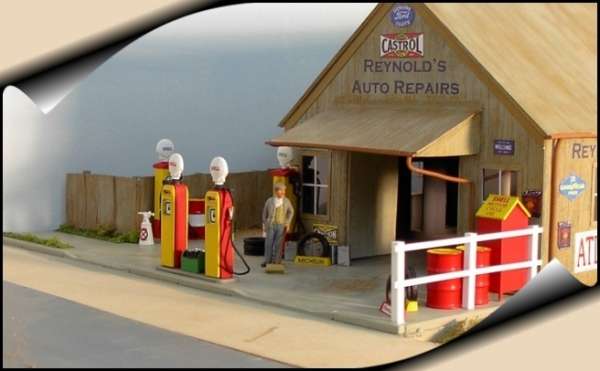
Reynold's Auto Repairs
One of the models on the "O" scale layout of Trevor Hodges
Building and Modifying 7mm Card Kits
I’ve been reading articles in UK modelling magazines for years about the good results to be had with card kits of model railway structures. I’ve tried these kits in the past but was never really happy with the result. I think part of the reason for this dissatisfaction was the fact that I’d been using kits that were pre-printed. This type of kit is certainly cheap enough; however their main drawback seems to be rather flat exterior detail and little chance to alter or add to the kit’s original design. With the experience I’ve gained from my most recent project for my "Morpeth" layout, my attitude to card kits has changed dramatically. Firstly, the starting point kit was not one of the pre-printed variety, so adding to and altering the kit was a breeze. Secondly, because the kit required me to colour and weather the structure upon completion, rather than relying on the printed details on the card, I was able to choose the colour and style of finish. This is not an option readily available on pre-printed card kits, unless you’re willing to paint over all of the printed detail.
The results of my efforts can be seen in the accompanying photos. "Reynold’s Auto Repairs" is the result of about three weeks work over summer and is named for my good friend, and fellow modeller, Stephen Reynolds. The kit is a Model Company 7mm scale kit of "Bert’s Garage" which was evidently inspired by a John Ahern model. Paul Bernsten, the proprietor of The Model Company, had his layout "Wexford" featured in the AMRM (Dec 1998) and you can see a picture of his garage in that issue of the magazine. I purchased the kit from Berg’s Hobbies a couple of years ago for no other reason than it was just about the only 7mm building kit available at the time and I figured that I would find a place to fit it on a layout at some point in the future. At the time I purchased it I didn’t realise that it was a card kit. As matter of fact I hadn’t even started building my layout, so worrying about how I was going to utilise it was a little premature. Another purchase I made on the same day was the garage detailing kit, also manufactured by The Model Company. I’ve been collecting 1:43 Trax model cars for a few years now and if these kits didn’t end up on a layout somewhere I could always make a diorama to help me display some of my ever-growing collection of die-cast cars.
Building the Kit
If you look at the photos you can see that the building is situated on a base that is a rather unusual shape. This base is wedged shaped and was made from three pieces of 16mm mdf glued and screwed together. The shape of the base is dictated by the space available in the corner of my layout, and was constructed when I put in a basic scenic shell about eighteen months ago, long before I knew exactly what building would eventually reside there. I could have made the base flat but I knew that it would be a much more interesting structure if it was stepped down, so I cut the mdf a little long, overlapped it and stepped it down toward the back. I placed this base on the layout, brought scenery up to its edges and simply left it in place until I was ready to put a building on it. I drilled a couple of screws into the base from the top and left them protruding so that I had something to grab onto when I
wanted to get the base out later.
The garage kit was a breeze to put together and I won’t describe it in any detail except to say that card has a softness, and ease of working, that is very different to styrene and wood. I shortened the main structure by about 2cm to get it onto the space I had available. The one thing I didn’t like about the kit was the steep pitch of the roof, which I felt wasn’t very typical of an Australian structure. I could have changed this, but I decided to leave it as is because it would have involved major surgery that I wasn’t prepared to undertake for a number of reasons I don’t really need to go into. The two major additions I made were to add the small awning on the front of the building, a very Australian feature, and the skillion roofed bump out on the back, which allowed me to take advantage of the 16mm drop from the level of the main structure to the back yard. I made the bump out from cardboard from the packaging that came with a collared shirt I’d bought a couple of years ago and kept: you never know what’ll come in handy do you? I clad the whole building in the card strips that came with the kit, made some steps from a Grandt Line step kit and some styrene, added a Grandt Line door and window and some gutters and down pipes of styrene and brass. I made the structure to fit on a 3mm piece of mdf that gave me the small rise I wanted for the concrete gutter at the front of the driveway. I cut two holes in this mdf and placed some embossed styrene in the holes and then filled around the edges to give myself a couple of pot holes. Once the building was painted and weathered I glued it to the mdf base and began working on the surrounding yards and driveways. The signs on the building are a mix of ones that came with the kit, some Gwydir Valley Models decals and some I made myself on an Alps printer.
The scenery and the detailing kit for the driveway took as much time as the building itself. The detailing kit is another Paul Bernsten product from The Model Company and shows just how good his products are. They were assembled as per the instructions, except for a little stand I made for the batteries. All the castings needed was a little work to get rid of mould parting lines and they were ready to paint. They were painted with Humbrol gloss enamels and decaled, after which I gave them a spray of Dullcoat. I couldn’t bring myself to follow my usual practise of gunging my models up ruthlessly with weathering. I justify this on the basis that the proprietor likes to keep his equipment and premises tidy and well maintained: look at him, he’s standing out the front sweeping up! The paint job on these details took ages but is well worth the effort. You get six bowsers in the kit, representing different eras, and a range of other details. I added to this assortment with some Ian Lindsay 44 gallon drums and kero tins. The scenery was all pretty straightforward, with the fences from styrene and corrugated aluminium, and the scenic material from Woodland Scenics. I made the dunny with left over styrene from the roof of the kit: remember I shortened it by 2cm so there was some left over material. The cars in the photos are from Trax and will probably be rotated regularly once the scene is incorporated into the layout.
Conclusion
A friend of mine was building a goods shed kit at the same time I was putting this scene together. Every time I spoke to him or visited his home he whinged about the problems he was having and the mistakes he’d made etc, etc. I had a hard time not smiling: everything about this project went well. The kit wasn’t what I would describe as "dead simple", but it was relatively easy to construct and I can’t complain about the cost of the alterations I made: you can’t get much cheaper than free, and I was being kind to the environment as well by recycling. I tend to judge a kit on how easy it is to alter and this kit came out with a score of 9/10, although I didn’t make what I would describe as major changes. What I don’t like is a kit that makes me wonder why I didn’t build something from scratch. The sexy bit is the detailing kit: I just love those details! When I look at the level of detail you can achieve in 7mm I have to ask myself: why would anyone bother sticking with HO?
Trevor Hodges
Click on picture to enlarge.
Use your "Back" button to return to this area.


