White's Weathered Willows
or

Making 7mm Sleepers Efficiently and Inexpensively

7mm sleepers

By
Rick White

All Photos by the Author


Introduction
My methods are not new. And like all these modelling things, it's a case of using what methods and tools that best suit *you*. The sleepers are made from balsa sheet stock. Balsa?? I hear you ask increduously?

I'm using balsa for a number of reasons :

a. It's cheap
b. It's readily available from just about any hobby shop
c. It's easy to distress
d. It takes all kinds of stains and paints very well
e. It comes in a good selection of thicknesses.

And the disadvantages?

a. It's soft and wouldn't hold track spikes by itself.
b. ...

So lets proceed.

I use cork under the sleepers and have found that the cork does an excellent job holding the rail spikes in place. No rail movement.

Step 1 - Tools & Equipment Tools Equipment

Rear to Front them from left to right in the photo

1. Monotony correction device (Can of beer)
2. Spray Adhesive
3. "Jo Sonja" - "Flow Medium"
4. "Jo Sonja" - Acrylic Paints
5. Razor Blade
6. Various paint Brushes
7. Balsa Wood
8. Sanding Block
9. Brass Wire Brush
10. Cutting Board

And the method I use to make the sleepers?

Step 2 - Cutting Grid Cutting Grid

The "Grid" is computer generated and aids in cutting the balsa strips to a uniform size. The paper Grid is glued to the balsa using "Fullers Spray Adhesive"
An alternative to this method is to use a plastic balsa cutting and stripping tool to cut the wood sheet into strips. These are available from model aeroplane supply hobby shops for around $15."

Step 3 - Cutting Balsa Strips Cutting Balsa

The balsa sheet is cut into scale 9" wide strips. I've calculated that I can get 210 - 9" x 4.5" x 8'6" long sleepers from one 3" x 36" sheet of 2.4mm balsa. $1.70 total. Now you can't beat that.

Step 4 - Distressing Balsa Strips Distressing Balsa

The 36" long strips then get distressed using a brass wire brush; the type sold in hardware and dollar shop stores everywhere. They look like a toothbrush in shape. If the wire brush is too stiff it will just rip the timber apart. Brass bristles work well.
The amount of distressing depends on how bad you want the final timber to look. For the sleepers, i gave them a moderate amount of stressing. Whatever the desired aging level you want, always brush the wood in the direction of the grain. Never across it.

Step 5 - Docking Balsa Strips to Size Docking Balsa

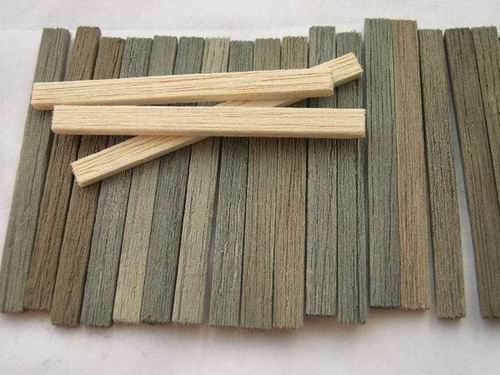
Once distressed, I give them a bit of a sand paper / sanding block cleanup to remove any fuzzies and then use a home-made chopping setup to dock them all to length. 15 sleepers per each strip of wood. The header photo (at beginning of article) shows some at this stage - before painting.

Step 6 - Painting the Base Colours Painting

Once done, they get stained and, or painted. This is where you can use any of 1000 methods. Again, your own preferred method.
I like to use acrylic paints to give each sleeper a good solid base coat. My preference is to use the "Jo Sonja" range of paints that are available at any art supply shop and which Bunnings now carry. This is not critical at all and there are several other brands. And i like their colour range. I also like to use their "Flow Medium" to mix the paints rather than water. It seems to hold the pigments in the diluted and mixed colours better somehow and makes painting the rough timber surfaces easier without filling in all the distressing done earlier. The sleepers get a good coating of the paint by mixing colours as preferred. The colours I mostly use are carbon black, warm white, burnt umber, burnt sienna and raw umber mixed to give a few shades of greys and browns. Nothing critical other than never use a colour straight from the tube. Always mix with a lighter colour like the warm white.
Don't be afraid to make the base coat colours dark. What you want to achieve is to make the deeper gouges from step 4 dark. The final colour effect of the sleepers is achieved in the next step. So make sure you give each sleeper a good solid colour

Step 7 - Dry Brushing Timber Sleepers Dry Brushing

I paint about 10 sleepers the base coat colour and then go back to each in turn and dry brush with the warm white before they dry out too much. The dry brushing springs out the high points of the sleepers' distressing and leaves the gouged parts the darker base colour.
Dip a stiff bristled brush in some white or light grey acrylic paint and then rub most of it off on some scrap paper until almost completely devoid of any remaining paint. You want the faintest amount of paint on the stiff bristles. Then lightly rub the side of the brush over the still tacky sleepers. Lay the brush sideways as shown in the photo so that you don't fill the gouges but just hit the top of the sleepers

That's it. I don't like using stains too much because I can't seem to control the colour.

Hope this helps,

Rick White


Click on picture to enlarge.
Use your "Back" button to return to this area.


This site was designed & built by Keiran Ryan Models