Step 1 - Tools & Equipment
|

|
If there is one thing that I would like to impress upon you, it is the benefit of using quality tools to do your work; the end result of any job is plainly due to the use of good quality tools. And there is also a saving by using good tools, because they last longer, and therefore you do not need to replace them as often.
- Stainless Steel Scissors
- Tweezers or other small no maring clamping device
- (Metric) Number Drills & Pin Vice
- Small Files
- Soldering Iron
- Hold & Fold Tool
- Solder & Flux or Solder Paint
- Snap-off Cutting Blade
- Fine Wet & Dry Paper
- 0.4mm brass wire (0.014")
- Burnishing Brush (Be very careful)
- Selley's Acrylic Quick grip
- Cutting Board
Lets get ready to Moddddddeeeeeelllllll
|
Step 2 - Preparing the Etch
|

|
- Re-Read the instructions (Yeah I Know!!!!!!)
- Using a 0.4mm drill, clean out all the holes in the etch.
- Using a sharp pointed pair of stainless steel scissors, cut the components out of the fret, as you use tham so as not to lose parts (refer to photo at left)
|
Step 3 - Preparing the Wagon
|
|
- The base of the S Wagon can be left attached to the body, due to the fact that the etch fits up against the locating pin. You can remove the wheel set if you wish, to provide better access.
- Remove the existing plastic brake brackets on the hopper (on both sides), and clean up the plastic so that the base of the vehicle is flat.
|
Step 4 - Fitting the brackets
|


|
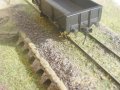
- The support brackets for the S wagon brake gear fit on the base of the wagon up against the locating pin but back from the end of the wagon. To gauge the distance back from the end of the wagon, use a section of brass fret surrouding the components.(refer to top photo at left)
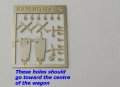
- The support brackets are folded at 45 degrees at both fold lines. they are then glued and pinned (optional) to the base of the wagon in the positions indicated.(refer to 2nd photo at left) The brackets are located so that the lower hole of the 2 holes (on the outside of the etch) is toward the centre of the vehicle (refer to 3rd photo at left)
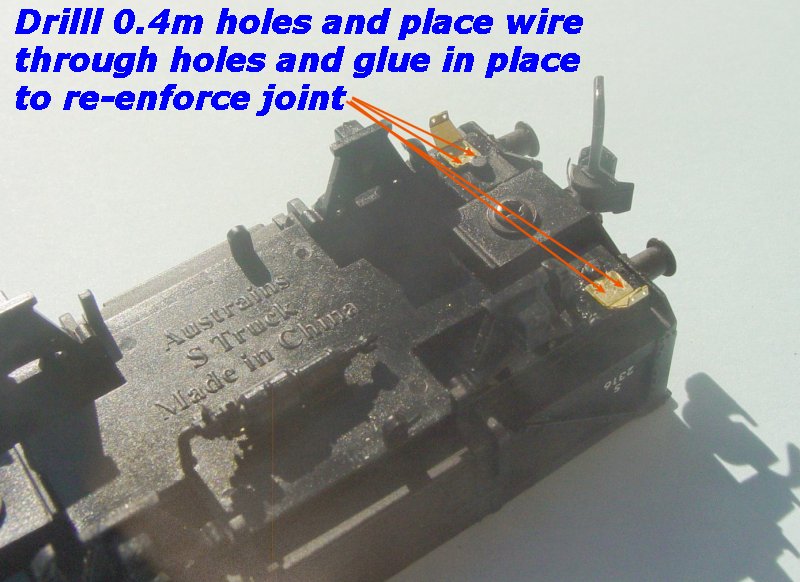
- You can re-enforce the brackets by drilling holes in the body using a 0.4mm drill, and fitting and glueing 0.4mm brass wire in the holes of the body.(refer to bottom photo at left) This process is optional.
|
Step 5 - Fitting the brake gear
|

|
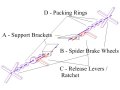
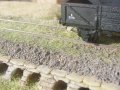
- The brake lever with ratchet is located on the left side of the wagon when looking at the end of the vehicle. (refer to photo at left)
- Use the centre photo at left to construct the components for the brake gear. (refer to centre photo at left) Use the photo gallery above to also obtain deatiled information on the location of the brake gear
- The brake wheel, lever and ratchet, can be glued or soldered in place.
- Solder or glue the 0.4mm wire to one of the brake spider wheels, ensure that they are square to the wheel.
- Solder or glue the 0.4mm wire to the lever/ratchet through the lever hole, as the other wire from the wheel goes through the ratchet. Pack the parts out using the washers/packing rings supplied with the etch. The diagram at left will assist in the location of all the components (refer to centre photo at left)
- The brake detail should look somthing like that as shown on the left (refer to bottom photo at left)
|
Step 6 - Paintimg
|

|
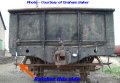
- For painting the finished vehicle, the preferred method is to use photos of the prototype in making this decision, as it is purely an individual choice , based on what you see in real life. I prefer to weather these vehicle, as they were only ever in a new condition ONCE in their life, from that time on, they became grubby, dirty, rusty & damaged.
- If you have any comments, or ideas as to how I can improve this kit, please don't hesitate to contact me
by email or phone on 61
2 46772462
|